Solar energy is a renewable source of energy and is the future of power. Today, we generate our energy needed for day-to-day use from the fossil fuels which are getting consumed at a faster speed.
Post your Requirement
Hence, human beings must make maximum use of the solar power to generate clean energy. For trapping the solar energy and converting it into a usable form, the solar panels are necessary. There are some simple steps which can help to understand how to make a solar panel.
Related Post: types of solar panels
Requirements for Solar Panels
The different things needed to build the solar panel include:
Enquire Now for Solar Panels
- The non-conducting material boards,
- Glass sheets,
- Solar cells,
- Tabbing wires,
- Soldering gun,
- Soldering lead,
- Wires,
- Toolbox,
- Diode,
- Charge controller,
- Battery,
- Silicone sealan, etc.
Steps to Build Solar Panel
Building a solar panel is very easy. There are many different methods which explain how to build the solar panel. The different steps involved in building the solar panel include:
- Buying Solar Cells: First, it is important to understand how much energy is necessary. The number of solar cells required depends on the energy needed. The energy needs depend on various factors like what all appliances will run on solar energy, number of people using it, etc. There are different suppliers who provide these solar cells. The best type of solar cells is the polycrystalline cells. However, these cells need careful handling as they are fragile in nature.
- Backing Board: As these cells are fragile, they need proper support on the backing material. This backing board consists of a non-conducting material which includes glass, wood or plastic. Cut the piece of this material depending on the size of the panel needed.
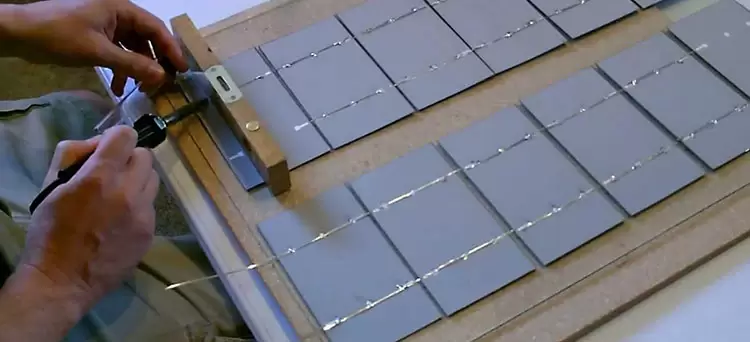
- Connecting Cells Together: The tabbing wire helps to connect all the solar cells to each other in a connecting manner. Use the soldering lead and soldering gun to connect the tabbing wire to the solar cells.
- Connecting Cells to Backing Board: Paste these connected solar cells to backing board with the help of glue. Ensure that these tabbing wires run in a single line without crossing. While attaching the solar cells to the board, make sure to leave some extra space on the edge. Connect the solar cells in different parallel rows.
- Use of Bus Wire: Connect the bus wire at the start and the end of each row. This wire helps to connect all the solar cells in a series.
- Panel Box: The panel box helps to hold these solar cells. Wood or any other non-conducting material makes up this panel box. The size of this panel box must be 1-inch bigger than the dimensions of the placement of the solar cells as well as the bus wires. Cut the plywood or any non-conducting material in the above size. This panel box should have a thickness of around 2 inches. Attach these pieces securely using the toolbox. Use a minimum of 3 screws per side to make the joints firm.
- Paint The Panel Box: Any color is suitable for the panel box but it is better to select some light color. This is important as light or the white color helps to reflect the light. Also, light colors help to keep the solar panel cool. Keeping the panel box cooler is crucial as it aids the solar cells to work more efficiently. The paint also helps to enhance the durability of the panel box.
- Wiring the Panel: Wire the final end bus wires to the diode with the help of wires. The diode selection should be such that it has higher amperage as compared to the needs of the number of solar cells. Use the silicone gel to secure the diode in position. The dark-colored end of the diode should point towards the positive end of the battery whereas the light colored end towards the negative end.
- Solar Charge Controller: Solar charge controller is a crucial part of the solar panel. It helps in regulation of the energy flowing from the solar cells into the batteries. Different types of solar charge controller include a simple controller, pulse width modulated controller and maximum power point tracking controller. The selection of any type of the controller depends on the need.
- Need for Using Charge Controller: The use of this solar charge controller is necessary as it helps to protect the battery from overcharging. It aids to increase the lifetime of the battery. The use of the charge controller also reduces the maintenance of the solar panel.
- Connecting Solar Panel to Charge Controller: Connect the wires from the terminal bus wire to the charge controller. Take care to properly connect the positive and the negatives. Color-coded wires help to keep the charge well separated and to reduce the confusion.
- Connecting Panels: If there are more than two solar panels, connect all the similar charged wires together and connect them to the rings. This helps to get only two wires, positive and negative to connect to the charge controller.
- Connection of Batteries: Select the batteries depending on the capacity which is compatible with the size of the solar panels. Then, connect the batteries to the solar charge controller.
- Sealing Panel Box: Make use of the plexiglass to seal the solar panel. The size of this glass should be able to cover the panel. Make use of silicone to ensure that the glass properly seals the box. This ensures to fill any gaps and make the solar panel waterproof.
- Mounting of the Panels: Mount these panels at the place where there is maximum exposure to the sunlight. The rooftop is the excellent location for the placement of these panels as it receives uninterrupted sunlight.
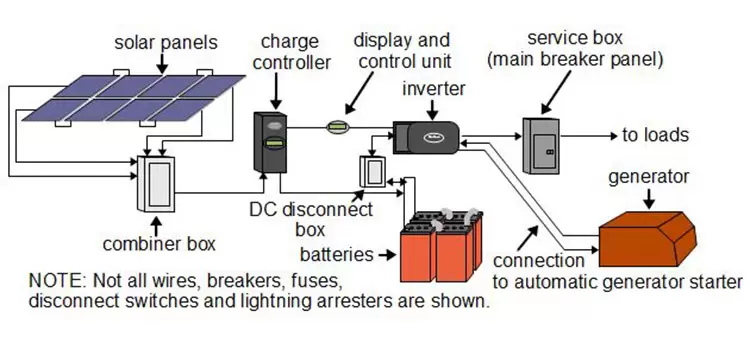
Solar Panel Diagram

The solar panel diagram is the map which shows the proper connections needed while setting up the solar panel. The working of the solar panel as depicted in the panel diagram includes:
- Entrapment of solar energy with the help of solar cells,
- Merging energy from different cells with the help of charge controller,
- Storing this solar energy into batteries for use.
- Conversion of DC energy output to AC current with the help of inverter. This helps to convert the energy into the form which is compatible with different appliances.
With all this necessary information, you can build your solar panel easily.
Locate : Solar Panel Manufacturers in your area
Buy aluminium casement window hinges at McCoy Mart online Hardware store with lowest price, top brands. Order online 7 days a week with fast delivery


Post A Comment