Doors and windows are an important part of your architectural design. Long gone are the days when the only option was wooden doors and windows. Architectures and interior designers personally prefer uPVC doors for their multiple benefits. If you want to change your old doors and windows into new ones, then this article will guide you with perfect instructions for uPVC door installation and uPVC window installation. This article will help you hone your carpentry skills by teaching you how to install uPVC doors and windows.
Post your Requirement
Before we start, make sure that all the products used in the process are of good quality to avoid any kind of harm. Also, check with the door or window dealer from whom you purchased to guide you with any specific requirements in regards to uPVC window installation as well as uPVC door installation. Most of the high-quality uPVC doors and windows come with a minimum guarantee of 10 years. Do not hesitate to spend money on it as it is a long-term investment.
The following materials will be required in uPVC door installation and the same for uPVC window installation:
- Safety gloves
- Safety glasses
- Spirit level
- Drill machine(electronic or cordless)
- Drill bits
- Measuring tape
- Paper tape
- Screwdriver
- Long screws
- Door sealant
- Polyurethane
- Pvc doors
Pre-Installation Instruction:
- Before installing the new doors and windows make sure that they are at least 1cm small in height and width to fit perfectly.
- Get rid of any furniture around the door and window so that you can have a clean and clear environment to work in
- uPVC windows are not load-bearing, hence you need to install a lintel above the window.
- Check the quality and design of the received doors and windows before installing them.
Installing The Door To The Frame
Once you have removed the old door you will have to install a uPVC door cill. Here you need a spirit level, drilling machine, crew driver and long screws measuring at least 15 cm. First drill holes in the brickwork with the help of a drilling machine. Then drill holes in the uPVC door frame. Make sure that you do not bend the frame in the process. Fasten the door frame by inserting the long screws using an electric screwdriver. Use a spirit level while installing the door to make sure that it is aligned properly also plumb.
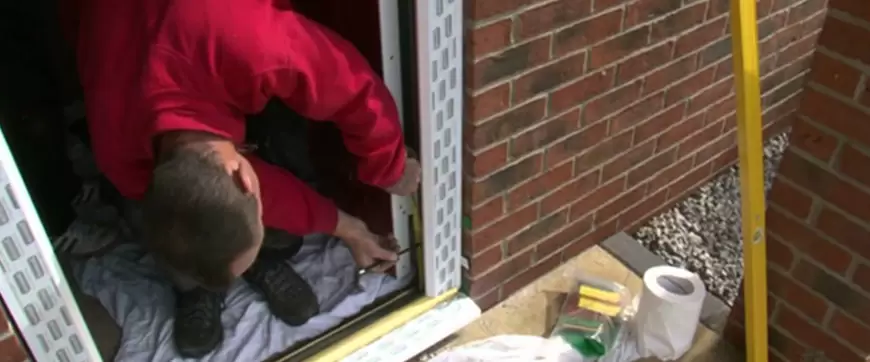
If you are replacing an old door, make sure that the measurements are precisely the same as the old measurements, but the door should be 0.5-inch smalls smaller than the dimensions. But if you are installing the door at a new house, then leave space around it so that you can easily plaster the brick walls.
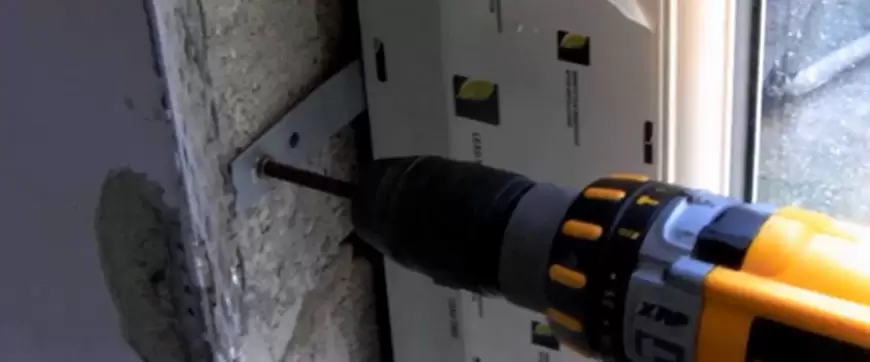
Lock the frame into position by fastening it with at least 3 screws on each side and 2 at the top and bottom of the door cill. With regards to the gap between the door and the wall, you will have to use sealant or polyurethane foam. If the gap is more than ½” or 1 cm, apply polyurethane. Where else if space is less, use the sealant used regularly. Select a waterproof sealant, so it can be painted to suit your interior design. Before applying the sealant cover the cill with protective tape or paper tape so that it doesn’t become dirty. Start applying the sealant from the corner to the beam till you reach the opposite corner. The sealant generally takes 15 to 30 minutes to dry out.
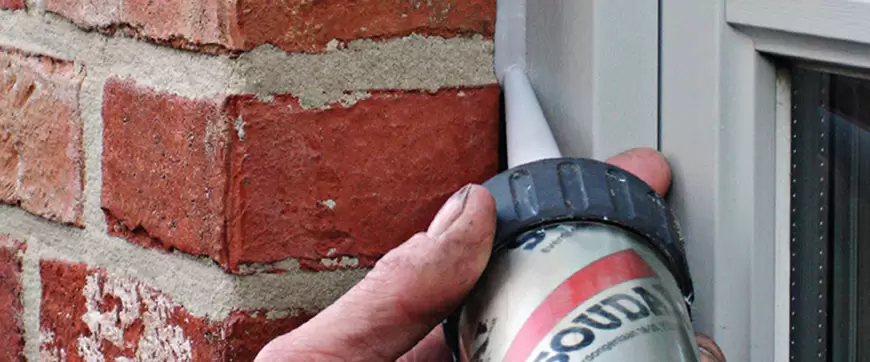
Keep checking the dimensions of the sill, to make sure that correct at the bottom, top and middle. If not you can still loosen or tighten the screws to get the perfect dimension. Once you have got the equal and correct dimensions, you can install the door panel.
uPVC Door & Window Installation
Once you have installed the frame, and the sealant has dried out, it is time to install the door. However, this process varies since the locking systems of the manufacturers are different.
The most common method is by using the hinges, but it is important to take care, as this is a delicate process and requires patience and utmost concentration.
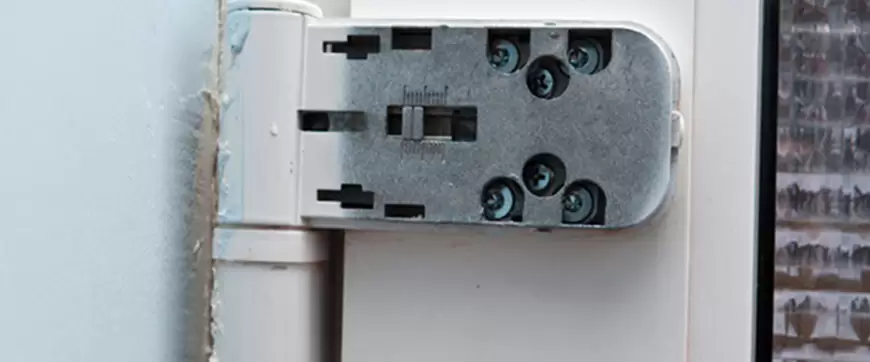
While most of the uPVC doors are already assembled with glazed windows, all you need to do is remove the tape from the frame. To adjust the door for lateral movement use Allen key bolts on hinges. Adjust the door to close properly by adjusting hinges using the screwdriver. The Allen key can also adjust the front door by placing it under the hinges and turning it to lock the correct position of the door.
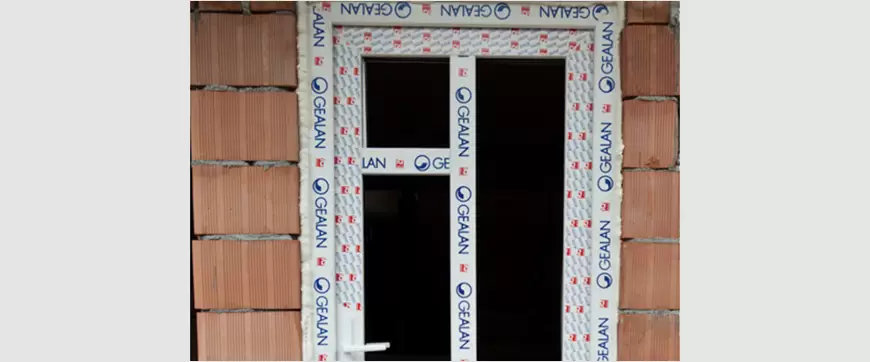
Remove the protective tape and clean the door with a wet cloth. uPVC doors need to be adjusted every 3 months as they could move from their initial position. Make sure that you follow the instructions correctly to get them done perfectly.
Steps to Install uPVC Windows and Doors
Installing UPVC windows and doors requires precision and attention to detail to ensure a proper fit and optimal performance. Here are the step-by-step instructions to follow during the installation process:
Step 1: Gather the Necessary Tools and Materials
Before you start the installation process, ensure you have all the required tools and materials. Common tools needed include a tape measure, level, screwdriver, hammer, silicone gun, and safety equipment such as gloves and goggles. The materials you’ll need include uPVC windows and doors, screws, silicone sealant, expanding foam, and shims.
Step 2: Measure and Prepare
Accurate measurements are crucial for a successful installation. Measure the openings where the windows and doors will be installed, considering both height and width. Ensure the openings are clean, free from debris, and level. Make any necessary adjustments to create a suitable and even surface for the installation.
Step 3: Install the Frame
Begin by placing the uPVC window frame into the opening and using shims to ensure it is level and plumb. The shims will help maintain the correct position before securing the frame in place. Once the frame is correctly positioned, use screws to secure it to the wall, ensuring it is stable and secure.
Step 4: Install the Window or Door Sashes
Next, insert the window or door sashes into the frame. Ensure they fit correctly and operate smoothly. Check that all moving parts, such as hinges and handles, are properly aligned and functional. For windows, apply silicone sealant around the outer edges to create a watertight seal and prevent air leakage.
Step 5: Insulate and Seal
To improve energy efficiency and weatherproofing, apply expanding foam between the window or door frame and the opening. This will fill any gaps and provide better insulation. Use silicone sealant around the perimeter of the frame, both inside and outside, to seal any remaining gaps and prevent water infiltration.
Step 6: Test and Adjust
Before considering the installation complete, thoroughly test the windows and doors for smooth operation and proper sealing. Open and close them multiple times to ensure they function correctly. Check for any visible gaps or drafts. If adjustments are needed, make them promptly to guarantee optimal performance.
Step 7: Clean Up and Maintain
Once the installation is successful, clean up any debris and leftover materials. uPVC windows and doors are known for their low maintenance requirements, but occasional cleaning with mild soapy water and a soft cloth will keep them looking fresh and attractive.
Read Also: ultimate guide on UPVC Doors & UPVC Windows.
Instructions To Follow While Installing uPVC Windows and Doors
Installing uPVC windows and doors requires precision and attention to detail to ensure a proper fit and optimal performance. Here are the step-by-step instructions to follow during the installation process:
- Safety First: Prioritize safety during the installation process. Wear appropriate protective gear, such as safety goggles and gloves, to avoid any injuries. If you’re not familiar with power tools or the installation process, consider seeking professional assistance.
- Preparation: Measure the existing window and door openings accurately. Double-check the measurements to ensure the new uPVC frames will fit perfectly.
- Gather Tools and Materials: Collect all the necessary tools and materials for the installation, including a saw, drill, screws, sealant, insulation strips, spirit level, and any specific hardware required for your windows and doors.
- Remove Existing Windows and Doors: Carefully remove the old windows and doors, taking care not to damage the surrounding walls or framework. Dispose of the old materials responsibly.
- Prepare the Installation Area: Clean the installation area and ensure it is level and free from debris. Check for any signs of damage or rot in the surrounding walls, and repair as necessary.
- Inspect New Windows and Doors: Before installing, carefully inspect the new uPVC windows and doors to ensure they are free from any defects or damage.
- Test Fit: Perform a test fit of the uPVC windows and doors in their respective openings to verify that they fit correctly.
- Install Windows First: Start with the Windows installation. Fit the UPVC frame into the window opening and secure it in place using appropriate screws or fixing brackets.
- Check for Level and Plumb: Use a spirit level to check that the window is both horizontally and vertically level. Make adjustments as necessary.
- Insulate and Seal: Apply insulation strips or foam around the edges of the frame to prevent air leakage and improve energy efficiency. Use a high-quality sealant to seal any gaps between the frame and the wall.
- Install Doors: Proceed with installing the UPVC doors. Ensure they fit properly in the door opening, and adjust the hinges and locks for smooth operation.
- Check Functionality: Thoroughly test the functionality of both the windows and doors. Open and close them multiple times to ensure smooth operation.
- Apply Finishing Touches: Clean up any smudges or marks on the UPVC surfaces. Add any additional hardware or accessories, such as handles or locks, to complete the installation.
- Check for Proper Sealing: Once the installation is complete, inspect all areas for proper sealing and insulation to avoid drafts and ensure energy efficiency.
- Dispose of Waste Responsibly: Dispose of any waste materials from the installation responsibly, following local recycling or disposal guidelines.
- Maintenance and Care: Educate yourself about the proper maintenance and care of UPVC windows and doors. Regularly clean and lubricate the moving parts to extend their lifespan and ensure optimal performance.
Conclusion
Installing uPVC windows and doors is a rewarding project that significantly improves the energy efficiency, aesthetics, and overall value of your home. By following these step-by-step guidelines, you can ensure a smooth and successful installation process. Remember that proper installation is essential to maximizing the benefits of uPVC windows and doors, so if you’re unsure about any step, consider seeking professional assistance. Embrace the durability and beauty of uPVC windows and doors, and enjoy the enhanced comfort they bring to your living spaces for years to come.
Remember, these instructions are meant to serve as general guidelines. Depending on the specific type and design of uPVC windows and doors you have, the installation process might vary slightly. When in doubt, consult the manufacturer’s guidelines or seek professional assistance for a seamless installation. Properly installed uPVC windows and doors can enhance the comfort, aesthetics, and energy efficiency of your home for many years to come.



Post A Comment